Wednesday, December 14, 2011

D.C. discoveries

It's been a while since I've been able to devote a meaningful amount of time to the family vacations scrapbook, but I have been able to complete, in bits and pieces, the section with photos from a trip I took to Washington, D.C., with my parents in 1994 to attend the Washington Journalism Conference. I was a senior in high school at the time, and I spent about five days at the conference while my parents stayed with friends nearby.

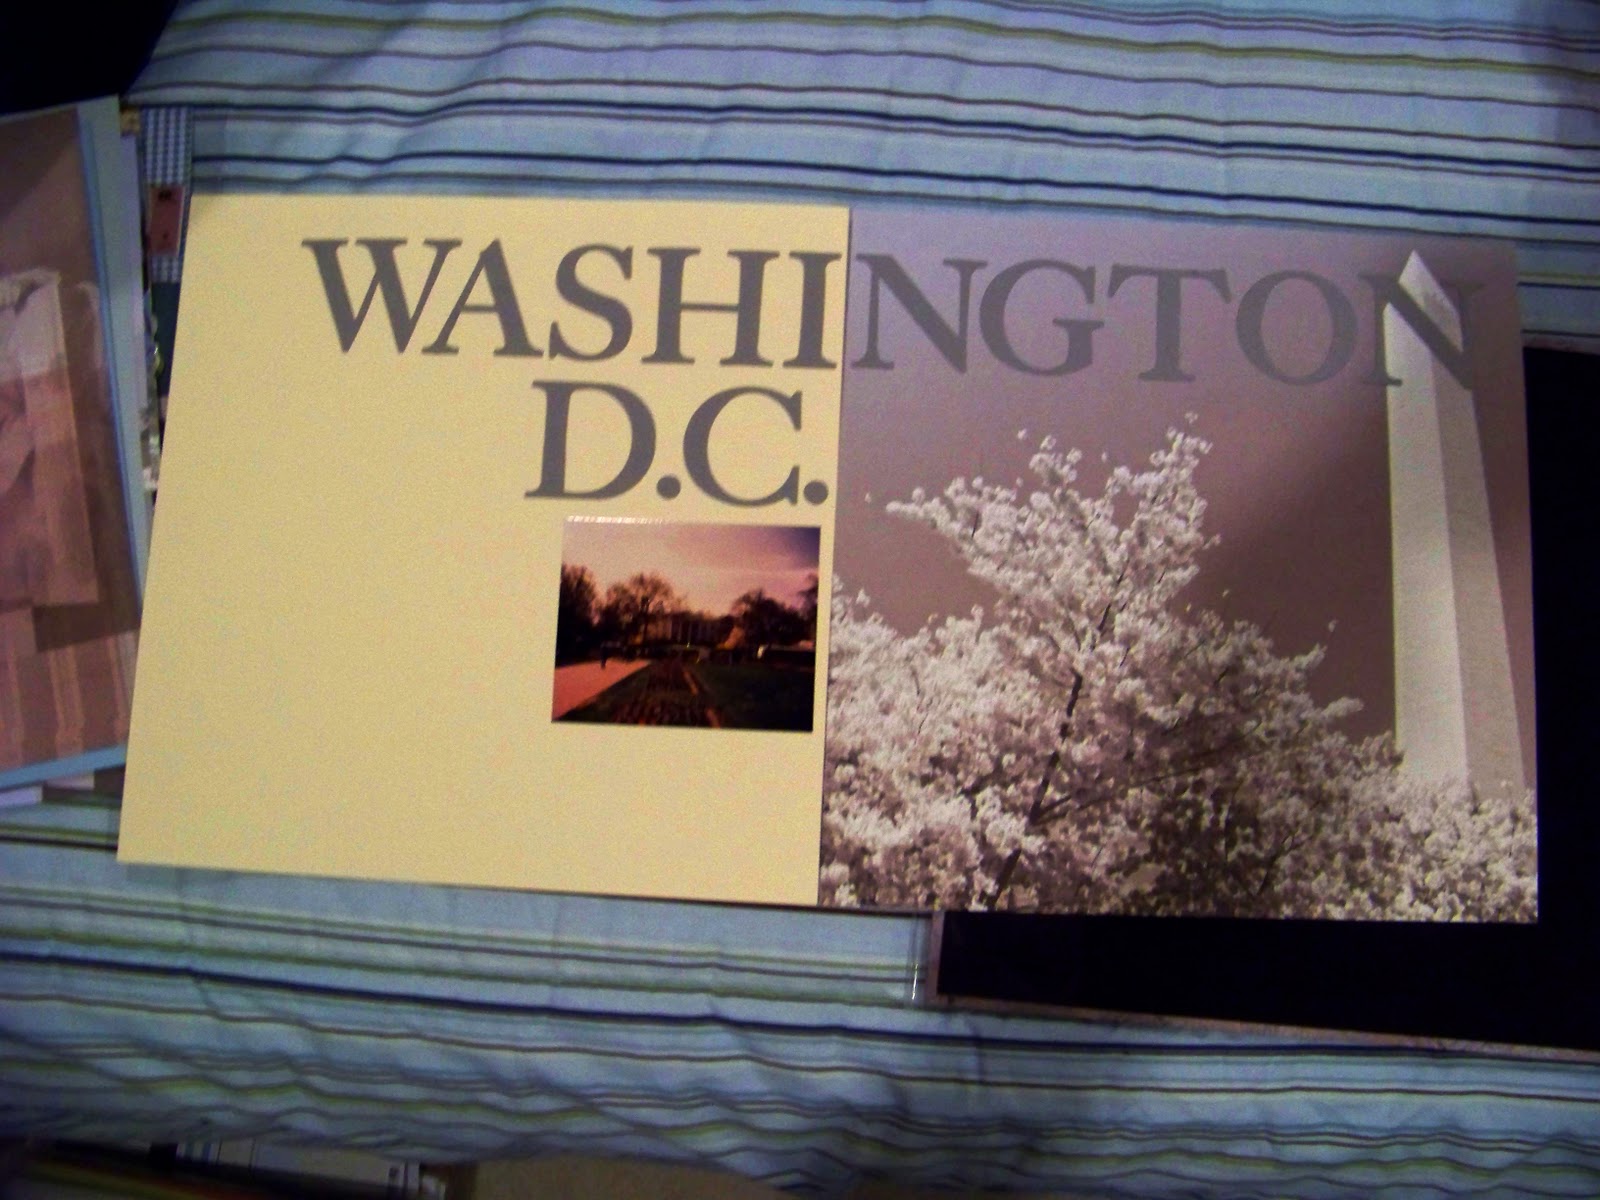
My plan is to create similar lead-in layouts for each trip, and since I have two D.C. trips to scrap, I made the one below as a lead-in for both, similar to the Los Angeles lead-in, then I created one specifically for the '94 trip (see second photo).  


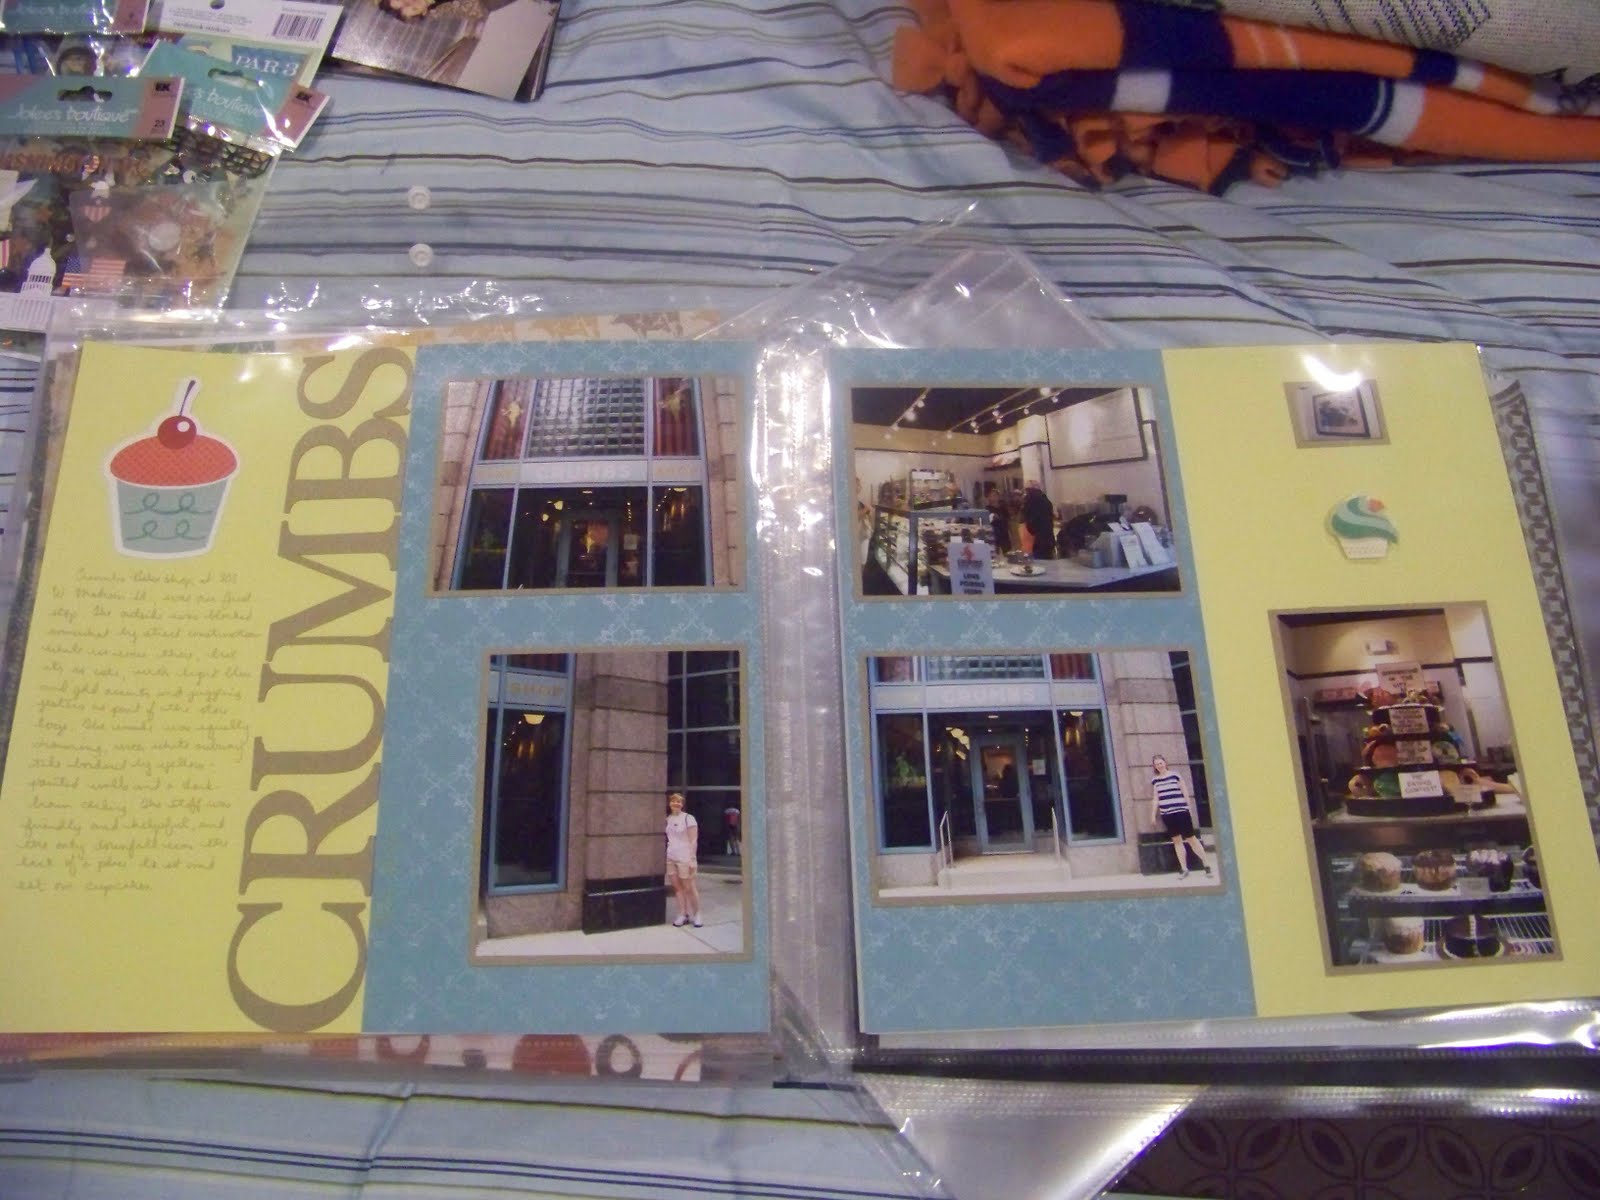
For the remaining layouts, I used a mix of D.C.-themed paper and a few stickers here and there, but for the most part I let the photos and journaling dominate the pages. I'm realizing the further I get into this massive, long-term scrapping project that I'm going to need to simplify my layouts if I want to make steady progress.

On the final layout, I felt the need to try being clever, with the "Quite imPRESSive" headline, putting emphasis on the "press," of course.


I still have two sections remaining -- a 1997 trip to D.C. for a wedding and a pair of Colorado vacations from the early 1990s with only a handful of pictures between the two of them. I don't think it will take long to finish once I have some time to dedicate to working on it. And I'm feeling more motivated and organized after spending my early November staycation stripping photos from all of my old, sticky-page photos albums and sorting them into storage boxes. It took three and a half days to empty the albums, but I feel much more prepared to tackle scrapping projects because I remember what I have in the way of photos, and I've been able to give some thought to how I might want to approach scrapping them. Reliving old times in my life has also fired me up to tell those stories through scrapbooks.


Sunday, November 13, 2011

Sun sets on L.A. project

The first of my old-photo scrapping projects is officially complete! I wrapped up the Los Angeles section of my family vacations book this afternoon. It spanned about a dozen double-page layouts, which means it's overflowing from the album I put it in. I need to add pages to accomodate it and the three other projects that must fit in that book. For now, though, I'll just share what I've done, minus the two layouts I posted previously:


Saturday, October 22, 2011

Tinseltown

With the cupcake crawl album finally finished, I took a short break to regroup and figure out what to tackle next. I've been feeling like I need to dive into an old-photo project, and I have a generic travel-themed scrapbook that I bought a while back and never found a use for, so I decided family vacations was the way to go.

I have pictures from several trips, although nowhere near all the trips we took when I was growing up. (I didn't start taking my own pictures on vacations until I was in my early teens, and I've decided, for the sake of keeping things as simple as possible -- for now, at least -- not to delve into my parents' vast collection of trip photos.) The vacations I have to scrap include two summer voyages to Colorado, a Los Angeles trip and two treks to Washington, D.C. Since I wrote on the back of all my Los Angeles prints (and since I love California and am excited to scrap all the beach photos), I'm taking on that one first. Here is my intro layout and the layout from our first L.A. stop, Hollywood:


I'm keeping these layouts pretty simple for the most part because I don't want the scrapping process to take forever for these older pictures. In many cases, the quality of the photos won't warrant special treatment anyway. I like having the chance to use the themed paper for the trip locales, though.

Friday, October 14, 2011

Cupcake crawl completion!

In a rush of energy (and time!) last night, I was able to finish the cupcake crawl album. I wrapped up the lemonade stand layout and the opening and closing pages, as well as the little window on the cover of the book.

I'm not thrilled with the opening page -- I didn't have a photo specially printed for that page, so I ended up using a leftover that wouldn't fit on my More Cupcakes layout. And I'm not sure I'm crazy about the overall design of it. I tried to take a risk and be different by angling the title, which I'm not sure worked. It adds character, I suppose. And it's done, which is the biggest thing.


The closing page is a pocket page that holds a couple copies of the piece I wrote for The State Journal-Register, along with clippings of a front-page promo and a stats box showing that the "guest column," as we called it, finished eighth for most-read stories on the SJ-R website the week it ran. I left some space just in case I get lucky and place in one of the contests we enter each year. I haven't entered it in anything yet, but I figure I might as well give it a try since these opportunities to write don't come up very often for me.


For the book cover window -- again, because I had no photo to use -- I wound up improvising with a dimensional cupcake sticker on a piece of cardstock trimmed to fit.


I'm more than ready to move on to the next project. I have a few more cupcake projects to work on, as well as a couple of favorite-things food pages -- my mom's strawberry shortcake and pumpkin cake. I think I need to break up my favorite things album into two books -- one for food and one for everything else! There's not a lot of "everything else" yet. I also really need to get back to focusing on my older projects, like family vacations, which would be the ideal project to start because I have a spare album that is thematically appropriate and I've already made the trip to Scrapbook Your Story to get paper and stickers. I also want to do an SJ-R book. And that's only the tip of the iceburg. It's a long to-do list!

Tuesday, October 11, 2011

The last stop

The Molly's Cupcakes section of the crawl book is done! I'm so close to finishing this book, but I'm taking a short break for a special project that I can't talk about quite yet. :-)

Here are the pics from Molly's:


This one came together pretty easily. I used a cupcake stamp from one of my Stampin' Up! sets on the page above, just to give it a little something extra. I really liked the combination of colors -- deep blue, pale green and fiery orange -- that these photos inspired.

Friday, October 7, 2011

Sleep deprivation and Swirlz

It's late and I'm tired (from staying up to finish the Swirlz section of the cupcake crawl book), so I'm going to keep this one short and sweet (no pun intended!).

Swirlz took three double layouts to complete, and it came together fairly quickly. It was a fun one with a lot of vibrant colors that reflected the atmosphere of the shop. The third layout is my favorite. I love the polka-dot paper and the combination of brown and green. I used the row house paper on the first layout to represent the residential area we passed on our way to Swirlz.

Next up is the last stop of the crawl: Molly's!


Wednesday, October 5, 2011

At last, Sweet Mandy B's ...

And now for my favorite stop of the crawl, Sweet Mandy B's.

I couldn't believe it when I found out there was a bakery with my name in Chicago, and Sara and I knew immediately we would be visiting this one. I could tell based on the website that it would be amazing, and it surpassed all my expectations. Spacious and painted in a lively pastel color scheme, it was pretty much how I'd imagine my own bakery if I were to open one. It was one of the largest bakeries we went to, and there was plenty of space to sit, eat and relax, unlike most of the other shops. We were able to watch employees mix colored frosting and ice cupcakes. Plus, there were all sorts of other goodies with the cupcakes in the huge display case, which spanned about half the length of one of the two rooms.

The cupcakes were, of course, delicious. They were the same size as a cupcake I might have made in my own kitchen, and the price was just right, too. At about $2 per cupcake, they were almost half the price of cupcakes we had at other places. And Mandy B's was the only cupcake I was able to eat in its entirety, rather than packing up some to take home. My lemon cupcake with raspberry frosting was sweet but not too rich, and the cake melted in my mouth. The frosting was a delicious buttercream.

Since Mandy B's was such a momentous stop for me, I decided the layout should reflect that. I had more pictures for it than any of the other bakeries, so it lended itself to more pages. I created an intro layout of sorts, with the Mandy B's headline and just a couple of photos as a window into the rest. A window, quite literally: The 5x7 I put on the right-hand page is a shot I took of a decorated window looking out onto the street in front of Mandy B's.


Next I focused on the storefront, along with my favorite photo that Sara took of me posing in front.


Finally, I fleshed out the atmopshere of the inside of the two-room shop.


Mandy B's had character and then some. I hope to be able to return sometime and try more of the cupcakes and the other amazing-looking sweets. Until then, at least I have my scrapbook!

Saturday, October 1, 2011

Smash progress!

I wrote a few days ago about my new mini Smash journal, and how it's meant to be a catch-all for mementos and scraps that don't fit into a bigger scrapbook. It's also meant to be completed quickly and without much effort -- I can testify that this is true. I spent a little time gathering ticket stubs, magazine clippings, fortune cookie slips and other miscellaneous souvenirs earlier this week and spent about an hour gluing it all into the mini-journal with the glue stick/pen that accompanied the book.

Granted, the journal isn't filled yet; there are some themed pages I'm saving for certain items, and I need to do some journaling. But I made considerable progress on a weeknight, while watching a TV show, by just grabbing and gluing. It's not completely organized, but it looks the way the Smash website tells me a Smash journal is supposed to look -- random. "Because you like it, and that's reason enough," is part of the brand's description on its homepage, http://www.eksuccessbrands.com/kandcompany/smash/. An example of tthat in my book would be the panel I cut off an empty tissue box just because I liked the pattern. Nothing is too silly, too insignificant, for your Smash book. And that's why the concept has won me over.

Here are some of my finished pages:


I think I'm officially hooked! My next goal is to buy one of the original, larger books for some of my bigger mementos. I love this small one, though. The portability is a plus. No more losing movie stubs in the bottom of my purse!

Wednesday, September 28, 2011

Smashing!

I have a new scrapbooking toy to play with. For my birthday, Sara got me a mini Smash journal. http://www.eksuccessbrands.com/kandcompany/SMASH/ I had seen them at Archivers but wasn't quite sure what they were all about, nor was I ready to stop and consider yet another potential project.

Until I unwrapped mine.


Smash books, as it turns out, are really cool, and their purpose is actually really practical. They're a catch-all for, basically, whatever you want to use them for. Ticket stubs, random photos, quotes, fortunes, etc. If you're like me and you have piles and drawerfuls and refrigerator-fuls of random little scraps you can't bear to part with but won't carry a 12x12 scrapbook page, Smash books are for you. My book has lined pages, blank pages, graph-paper pages and pages with clever photos, drawings and phrases. (Note the cupcake-themed page, third in the sequence.)


It's a fun, inspiring little album. There's no need for grouping common mementos or arranging things neatly. Just glue it down with the glue stick/pen combo that comes with the book and you're done. Part of the beauty of it is you don't have to agonize over placement or design or color schemes. Just "smash" it in there. There's also a coordinating line of stickers and other accessories to dress up the books that run about $2 each. Click this link to flip through a detailed Smash book catalog: http://wcv2.com/publication/?i=79855.

The best thing about these types of books, though, is that you don't need any particular brand of accessories to fill your book. Just use the miscellaneous tags/stickers/chipboard letters that are cluttering up your supply area. You know, the pieces from kits that just never quite fit with any of your previous scrapping projects. What a great way to finally use up some of that stuff! You don't even need a Smash brand book. You could make this out of just about any notebook or journal.

I spent about an hour after work last night digging through the house and making a pile of scraps for my Smash book. I can see myself making another after I fill this one, because I'll never stop accumulating random stuff.

For  more on building Smash books, watch this video from EKSuccess: http://www.youtube.com/v/_PFsArr4Z1s&hl=en&fs=1&rel=0&autoplay=1

Monday, September 26, 2011

Sprinkles cont.

During a busy weekend without much time to scrap, I managed to squeeze in some time to finish the second part of the Sprinkles section of the cupcake crawl book. With this one, I had to cram in a lot of pictures (all vertical or square), but I didn't want the layout to look too cookie-cutter or dull. So I used my circle punches to make the dots Sprinkles uses as its signature cupcake garnishes and as its code for flavors. Running them down either side of the layout gave it the punch (no pun intended!) I was looking for and just kind of brought the whole thing together. The Sprinkles dots reminded me of the design at Dylan's Candy Bar in New York. When Sara and I did our scrapbooks from that particular trip, she had the idea to make the dots with the punches, and I copied her. It was her idea that inspired me for Sprinkles, too. Thanks, Sara! :-)


Thursday, September 22, 2011

More ... Sprinkles!


1 trip to Hobby Lobby + 1 50% off scrapbooking sale = 2 3-packs of Tombow refills for $13. Not bad! Best of all was being able to scrap again on Monday night. I polished off the final More layout, which included a trio of shots Sara took of me trying the Bacon Bacon Bacon cupcake, which I ended up hating. I kind of look like I'm enjoying it in the final photo, but I think it was taken before my brain had had a chance to catch up to my tastebuds. When I saw that More specialized in eclectic flavor combinations, I knew I was going to have to try one for the SJ-R story. Bacon Bacon Bacon was the odd choice of the day, so that's what I went with. You can read more about it on my cupcake blog, http://extremecupcaker.blogspot.com/2011/08/bacon-and-cupcakes.html, but the gist of the story is that the cupcake was top-to-bottom bacon. Bacon in the frosting. Bacon in the cake. Bacon in the brittle garnish. I love bacon, but it needs to stay in its proper place next to the pancakes and eggs.


Upon wrapping up More, I moved on to the first of what will be three double-page Sprinkles Cupcakes layouts. I was looking forward to this one because of all the whimsy and dynamic color that define Sprinkles. On the left-hand side of the first layout, I used a round sheet with a scalloped ring and colorful sprinkles that I took to be cake- and cupcake-related when I picked it up at one of the scrapbooking stores. I used it to frame one of my favorite pictures from the crawl, an overhead shot of the salted caramel cupcake I bought at Sprinkles to take home for a later snack. I didn't sample it for the SJ-R story, instead splitting a cinnamon sugar cupcake wtih Sara for the evaluation. Two photos of that cupcake are included on the right-hand page, along with the vanilla coconut Sara bought as her to-go selection and another photo of some of the cupcakes in the Sprinkles display. I used Ranger brand Liquid Pearls in White Opal to add some oomph to the cream-colored background paper and to evoke the look of frosting.


If I can resist the temptation to eat cupcakes as I'm scrapping them, I'll return to my scrapping room soon and finish out the Sprinkles layouts. It's a good thing glue on my hands makes eating unappealing!

Saturday, September 17, 2011

Only lack of adhesive shall stand between me and my scrapping

I struggled a little with the second part of the Sugar Bliss Cake Boutique section of my cupcake crawl album. I had used most of the photos in the first part but had just enough left to warrant a second double-page layout. So I arranged. And rearranged. And rearranged again. I dug up some flower border stickers that were close enough to the Sugar Bliss color scheme that they worked. And I found my first use for a small but adorable cupcake stamp I found at a crafting booth inside the Grandstand at the Illinois State Fair. One thing I love about scrapbooking is that, no matter how challenging a layout might seem, there's always a way to pull it together if you can be resourceful with your supplies. Granted, that's not to say the layout worked in the end -- everything's subjective. I probably could have done better, but I was reasonably happy with the way it turned out. (It's hard to see them in this picture, but the little cupcake stamps run vertically down the left side of the left page and the right side of the right page.)


Then I moved on to More Cupcakes, our third stop on the crawl. It was such a small, minimalist store that I decided to go with a similar type of layout for that shop's two sets of double-page layouts. No patterned paper I had seemed appropriate for the sparseness of More, so I went with solid black for the background and skipped the embellishments. I did use the menu along with several photos, though.


I was in my zone and ready to keep going, but then the worst thing happened to me that can happen to an in-the-groove scrapbooker: I ran out of adhesive. I plan to make a tape run tomorrow, but until then I'll just have to hold my scrapping thoughts.

Thursday, September 15, 2011

Sugar blissfulness

After a long, drowsy day at work and a tough workout, I was thrilled to be able to come home to dinner in the crock pot and extra time to work on the cupcake crawl album. After a quick bite to eat, I retreated to my little corner of heaven here at home and dove into the first half of my Sugar Bliss Cake Boutique layout. Sugar Bliss was the second bakery on the crawl, in the Loop not far from Crumbs.

I loved the atmosphere of Sugar Bliss, a modern shop decorated in shades of blue and brown. The cupcakes themselves were a design element, with their flower-shaped frosting toppers. We had the option of standard-sized cupcakes or miniatures, and the minis were a real plus in light of the lengthy list of stops still to come.

Here's the first part of the Sugar Bliss layout:


With any luck, I'll have the second part posted soon!

Wednesday, September 14, 2011

Cupcakes + scrapbooking = heaven!

If you're a reader of both my blogs (LaVonne, this is directed at you! :-) ), you might battle with your self-discipline when you see the photos of cupcakes I regularly post on Extreme Cupcaker. And you might, if you have the time, come over to Mandy Scraps for some fat-free, calorie-free relief. Unfortuantely, LaVonne, there's no escape anymore. The cupcake crawl scrapbook is in progress. (Insert evil laugh here)


I know, I know. I'm awful! :-)

After completing several small projects during my staycation last week, I finally decided to start the crawl book. I'm going in chronological order, starting with the first bakery we went to that sweet morning, Crumbs Bake Shop. I ended up with three double-page layouts for Crumbs because I had a lot of pictures from that one, and I had a hard time eliminating. On the first two pages, I coordinated colors to the color scheme of the shop itself -- pale yellow and pale blue. I love scrapping bakeries because they're so whimsical and colorful.


The assortment of cupcakes at Crumbs was photogenic, to say the least. There were so many I wanted to try but couldn't, and that's what these pages were dedicated to -- the ones that got away. :-) It's hard to see from this shot, but some of the featured cupcakes are the grasshopper, cookie dough and Reese's Peanut Butter Cup.


The final spread for Crumbs is a pocket page to hold the copy of the menu I picked up and wanted to keep as a souvenir of the store's offerings. I added photos of the cupcakes we actually tried -- the ones that made it into the piece I wrote for the SJ-R. The picture on the right side -- taken in mouthwatering detail by Sara, who is a photographic genius -- is the cookies and cream cupcake we split. The much smaller picture on the left page is the other one we tried -- the milkshake. Sara favored that one, while I was partial to the cookies and cream. (It worked out for the best because we knew who would claim the leftovers -- we needed to save room, after all, so we each took just a few bites from both cupcakes.) The frosting, to me, was the best part of the cookies and cream. It was a scrumptious, generous slather of buttercream. The milkshake was a marble cake with "marble" frosting, meaning a mix of chocolate and vanilla. It was good, but it didn't speak to my tastebuds in quite the same way as the cookies and cream.

I like using the pocket pages. They come in different sizes, patterns and colors, and I can see myself using them quite a bit. Sara was the one who gave me the idea to try a homemade pocket in my 2008 New York album, and it worked out fine, but I still like having the pre-designed pockets.

I'm having so much fun with this album so far. Now that Crumbs is finished, I'm organizing paper, photos and embellishements for the next section, which will be Sugar Bliss Cake Boutique. I need to come up with an intro page for the whole thing, but I tend to leave those for last, when I've established the overall feel of the book. I hope to get rolling on Sugar Bliss this week, and when I finish it, I'll post photos.

Thanks for reading!

Monday, September 12, 2011

Tribute to Typo

Over the weekend, I finished the framed memorial to the SJ-R's "adopted" feral cat, Typo, which we hope we'll be able to display somewhere inside the newspaper building. Typo was a special cat, loved by many staffers, and I hope the memorial reflects her spirit and the joy she brought us over the years. I used senior news editor Daron Walker's photo of Typo from the early 2000s for the dominant image, and the smaller photos were sent to me by other employees, some of whom (or maybe all) had taken the shots on their cell phones. Typo, may you recieve all the ear scratches your heart desires in heaven!

Monday, August 29, 2011

A finished Paris album and other thoughts

After a long absence from this blog, I'm back to say that, although I haven't blogged about my scrapping lately, I have been scrapping. In fact, I have finished the Paris book, and once I have the chance to run over to Scrapbook Your Story for some page protectors, I'll be able to fully assemble it.

Here are two of my Eiffel Tower layouts. For some reason, I'm having trouble uploading photos to the blog, so I don't think I'll be able to add any more to this post. :-( Maybe I'll try again later.


There were so many great things to photograph in Paris that it was hard to narrow down my pictures to a reasonable number for the scrapbook. Natalie gave me a great idea to use one of the pocket pages that came with my variety pack -- a 12x12 with nine 4x4 pockets -- at the end of the book to make a couple of collages of cropped photos. As I was working on the book, I set aside photos that wouldn't fit in the main part of the book for possible use in the collages. I was able to use almost all of them that way. I would include a photo of the collages if I could get the photo feature to work! (Enter my frustration with technology!)

Now that I've finished my first hybrid album, I have to say I've measured the pros and cons. I love the ease of the 3-ring binder, but the pocket pages were a little inconvenient in the sense that they restricted me in some of my layouts. I can see myself using hybird books for future projects, though -- especially small, simple projects such as one I'm planning for a Christmas gift.

With Paris 2010 finished, I'm in between projects, trying to decide what to start next. I have a weeklong staycation starting a week from today, and I'm hoping to get in plenty of scrapping time. One project I need to do soon is a framed photo page in memory of Typo, the feral stray that adopted the SJ-R as her home more than 10 years ago and had to be put to sleep last week because she had large mammary gland tumors. I've gathered several pictures coworkers took of her over the years, and we're hoping, once I finish it, that we'll be allowed to hang it up somewhere in the building. Some other books I'm eager to dig into: the cupcake crawl, my reunion weekend at U of I with Sara, Heather and Steph this past April; a book of childhood family vacations (part of my long-term "scrapping the old, yellowing pictures" project); and a number of single layouts for my "favorite things" scrapbook, including Krispy Kreme, Einstein Bros. Bagels and meeting Boyz II Men. 

I decided to do a "favorite things" book back in March, during my last staycation, when I realized my tendency to take pictures of the things I love most in life. By "things," I mean things that are tangible (I should probably tackle people and concepts in a different book). For example, so far in my "favorite things" book, I have a lot of foods and food places -- cupcakes, Mel-O-Cream doughnuts, my mom's banana bread. I also have the old Doc Marten sandals I got just after college and wore for several summers, to the point of needing a strap repaired (after which I wore them for at least one more summer). And then I have a layout for all the Dave Matthews Band concerts I've been to. (I wore the sandals to a few of those!) It's fun to have a book dedicated to the small things that bring me joy. I'm all about taking pleasure in the little things. There just aren't enough "big" moments in life. We need to find happiness and contentment in the ordinary.

I'm sure in the coming days I'll become inspired for my next project. I have a few things to focus on before I can relax, though. I have a retreat next weekend on which I'm giving a talk, and I need to get through three more days of work. I'm more than ready for a week of leisurely scrapping, though. I know I can accomplish a lot in several wide-open days. Only seven days till then!

Tuesday, August 16, 2011

Scrapping a T-shirt quilt

I have a thought, and it's out of left field. I have a big plastic container full of old T-shirts I had planned to have made into a quilt. I asked around and found a quilter willing to do it. The problem? The cost is prohibitive, to say the least. Let's put it this way: for the cost of having a large T-shirt quilt made, I could get a good start on a new car. So I've started trying to think of alternative ways to preserve my shirts.

Of course, what's the first thing I thought of? Scrapping! I'm brainstorming whether or not there's a way to put my shirts into an album in a way that will be as satisfying to me as having a quilt.

I'm a highly nostalgic person, so it's hard for me to let go of things that have a lot of sentimental value. My T-shirts fall into that category. They represent everything from college to my favorite sports teams to my career and memorable places I've traveled to.

My only concept so far is to take close-up photos of the images on each shirt and put as many of them on a page as possible. (I'm thinking a hybrid album would be ideal for this project becuase all I really need are pocket pages. Multiple photos of T-shirts don't require much creativity to display; I just need to be able to see what's printed on the shirts.)

If you're reading, do you have any ideas for me as far as how to approach this project? I welcome scrapping and non-scrapping ideas. If anybody knows of a way to preserve my T-shirts on the cheap, please let me know!

Monday, August 15, 2011

Eiffel pages under way!

I've reached the part of my Paris album that I've been looking forward to since I started -- the Eiffel Tower section.

I have so many pictures that it's hard to decide which ones to use and which ones to weed out so the ones that make it in the book will have the most effect. I'm notorious for stretching what should be one or two tight, double-page layouts into four or five bloated ones -- I have a tendency to be repetitive. So I need to go through my tower photos and make some painful decisions about what stays and what goes in the interest of making the book as a whole the best it can be. Possible options for those leftover photos: framing, using on greeting cards or cropping for use on a collage page at the end of the book (this is an idea I got from my friend and fellow scrapper, Natalie). Or a trick I learned from my college best friend, Sara -- reducing photos to a smaller size, by way of Walgreen's collage prints (wwww.walgreens.com) so you can squeeze them in -- creatively and artistically, of course. ;-)

I'm close to finishing this album -- after the Eiffel Tower, I have one more small section and one single-photo page. Then I can start thinking about which project I want to tackle next. I want to do the Ivory Coast before we get too far removed from the trip, but I'm also feeling pulled toward the cupcake crawl and one of my projects with old pictures. I'm thinking the Ivory Coast would be a great project for winter, when it's cold and gray outside and I'll be in the mood to work on pages with colorful, tropical photos.

I'm feeling just inspired and motivated enough to tackle them one at a time -- and I really believe, at this point, anyway, that I can get it all done. By the time I'm 80, anyway ...

Saturday, August 13, 2011

Taking the hybrid album for a test drive

In my last post, I wrote about my vast goal to get all my old pictures into sparkling, new scrapbooks. I'm excited to get started, but I'm juggling them with current books I'm equally excited about completing.

My latest project is a book about our three-day stop in Paris last year on our way to visit my husband's family in Ivory Coast, West Africa. It's my first project using a "hybrid" album -- the 12x12 3-ring binders with a variety of pocket pages you can simply slide your photos into. With these books, you have the option of a page as simple as a group of photos or as elaborate as a picture here, an embellished block of cardstock there. It's a good concept, in my opinion, and no doubt the perfect solution for some scrappers. For me, it's turned out to be a mixed bag. I like the option of the pocket pages, and I LOVE the ease of popping open the binding without the hassle of taking the entire book apart, like with postbound albums, which I normally use.

What I don't like is how the pocket pages force you into layouts. I've labored to find just the right combination of horizontal and vertical photos to fill a page, only to turn the page and realize I have to do it all over again because I have to fill the back side. I've actually taped pocket pages together just to escape that frustration,which is a total waste of resources. My other pet peeve is the fact that the pages don't meet in the middle in hybrid albums. The 3-ring binding, much as I love it for its convenience in moving pages around, keeps me from being able to design a cohesive double-page spread with a photo or headline across the break in pages. That's a technique I've become rather fond of in the past couple of years, and I would hate to give it up.

I'm still open to using hybrid albums for some projects -- especially those with a lot of photos of the same thing, or for layouts for which I can't find just the right paper. And I just can't quite let go of that 3-ring binding's ease of use.

But, for the most part, I think I'll be sticking with my postbound books ... and, oh yeah, grumbling whenever it's time to add pages!

This is your life -- in scrapbooks

Hi there. My name's Mandy, and I'm a scrapaholic. I think I always had the seed inside of me -- even back in grade school, when my idea of a photo album was a flip book where I put my pictures and maybe a ticket stub or receipt. By college, I was using the sticky, peel-back albums, and I was saving all types of memorabilia to include with whatever pictures I had taken. I thought I was so clever because I angled the photos on the pages. Can we say "thinking out of the box"?! Ha!

My first "real" scrapbook was a spiral notebook I bought at a shop in New York City when I was there on vacation with a couple of my coworkers in 2001. I thought it was the coolest thing when I found it -- divided into sections, it had lined pages, blank pages, pocket pages and graph paper pages. It even had pages that looked like they were specially designed for writing music. If I knew anything about writing music, I SO would have filled those pages with my own ode to the Big Apple.

As it turned out, I used the book to keep a daily journal of the trip, and when I got home and developed my pictures (I was still film in '01 and didn't go digital until midway through 2004), I taped them onto the blank pages, behind the journaling. The pictures were mostly dark and grainy, and I didn't have a single embellishment, but the mere combination of photos and journaling were the foundation of what my scrapbooking would eventually turn into.

Now I'm thinking about all those old albums -- especially the peel-back ones, which are starting to yellow -- and I'm seriously contemplating how to approach a massive scrapbooking project that would entail getting all of those photos into brand-new, acid-free scrapbooks. It will take years, if I even make a dent before life brings some kind of challenge or surprise that tears me away. I've started going through photo boxes full of extra copies from the days of free doubles at Walgreens, and I'm formulating ideas for how to break them up into chunks that I could scrap one at a time without feeling completely overwhelmed. Nothing appeals to me more than having shelves full of colorful albums neatly labled with their subject matter, telling the story of my life up to this point, and even a sampling of my parents' story based on old pictures my mom has given me over the years. I'd love to create a collection that my husband Camille's and my eventual children could look at one day -- not to mention being able to enjoy them over and over again myself.

So I've started the sorting, the brainstorming and the list-making. Next up is picking a subject and finding the time to start the first book. I have a weeklong staycation coming up in September, and my plan is to really dig into the sorting then, and try to get as many pictures out of the old albums as possible. I just need to make sure I file them chronologically and write names and dates on as many as I can so that once I get around to doing the books, I'll have all the information I need right at hand. Why, oh why didn't I write on the backs of ALL my pictures when I developed them? Oh well. What's done is done.

If anyone reading this has undertaken a similar massive project, I'd love any tips you might be able to offer. Thanks in advance, and happy scrapping!